
Planning to edit the Images! But worrying it will alter the original image?
The world of digital art and photo editing has introduced – Adjustment Layer
Whether you are enhancing colours, altering brightness, or adding effects all these changes
are possible without compromising your project. Adjustment layer maintains the integrity of your original photo while making adjustments.
Adjustment Layers in Photoshop: Essential Guide
In this blog, you will learn about the Adjustment layer and the variety of adjustment layers available across digital editing software.
What is Adjustment in Photoshop?
Adjustment layers in Photoshop are a group of very useful, non-destructive image editing tools that add colour and tonal adjustments to your image without permanently changing its pixels.
adjustment layers, you can edit and delete your adjustments or restore your original image at any time. This will make your workflow in Photoshop much easier and more efficient, and it is absolutely essential to know. With the adjustment layer, you can change the tonality of images, and fill the colour in the images. Adjustment and fill layers have the same immense visualization and overall mod options as layers.
Types of Adjustment Layers
There are a variety of adjustment layers available in Photoshop, each serving a unique purpose in the image. Here are some of the most commonly used.
1. Brightness/Contrast

The brightness and contrast option in the adjustment tool is used to adjust the overall lightness or darkness of your image. Brightness is a basic tool use for fine-tuning the exposure of your image.
The brightness slider is for you to adjust the lights in the image.
The contrast slider is for you to adjust the darkness in the image.
2. Levels
Levels help you fine-tune the tonal level of image. It consists of three tones – shadows, mid-tones and highlights individually.

Shadow is the darkest part of the image, Highlights are the brightest parts, and midtones are the parts in between everything. When you make level adjustments When you do this, you are adjusting the different tones in the image.
The graph option is in the middle of the properties panel. This is called a histogram, and it shows clarity about the shadow highlights and midtones of the image.
Just below the histogram are the Input Levels sliders – these are the controls you’ll use to adjust the levels. Don’t use the Output Levels slider near the bottom of the panel.
Our image is too dark. We will click and drag the white slider to the left. Notice how we are dragging the slider to the right edge of the histogram. If the shadows in the image are too bright, you can click and drag the black slider to the right. In this example, we don’t need to adjust it because the slider is already on the left-hand edge of the histogram.
If the image appears too dark or too bright, you can click and drag a grey slider in the middle to adjust the midtones. In this example, we will move the slider left or right to make the image brighter.
3. Curves

Curves provide the option to have more advanced control over brightness and contrast than Levels.
Curves also provide more control and flexibility, as they allow you to adjust any point along the tonal range without affecting other areas.
4. Hue/Saturation

The hue/saturation feature lets you adjust the hue, saturation and lightness of a specific range of colours in an image or simultaneously adjust all the colours in an image.
Hue/Saturation Properties panel
The most basic level of the Hue & Saturation panel will affect the overall hue, saturation, and lightness of the colours in your image. The adjustment paneln layer contains a slider for each of these adjustments.
Hue
When we left or right the slider the colour changes throughout the image (Hue changes the overall colour of your image)
Saturation
Saturation changer image contains vibrant, highly saturated colours, or is monochrome. Saturation can lighten or darken any colour.
Hue/Saturation
Lightness affects how your image is bright or dark. Essentially, you can use this slider to change how under or over-exposed your image.
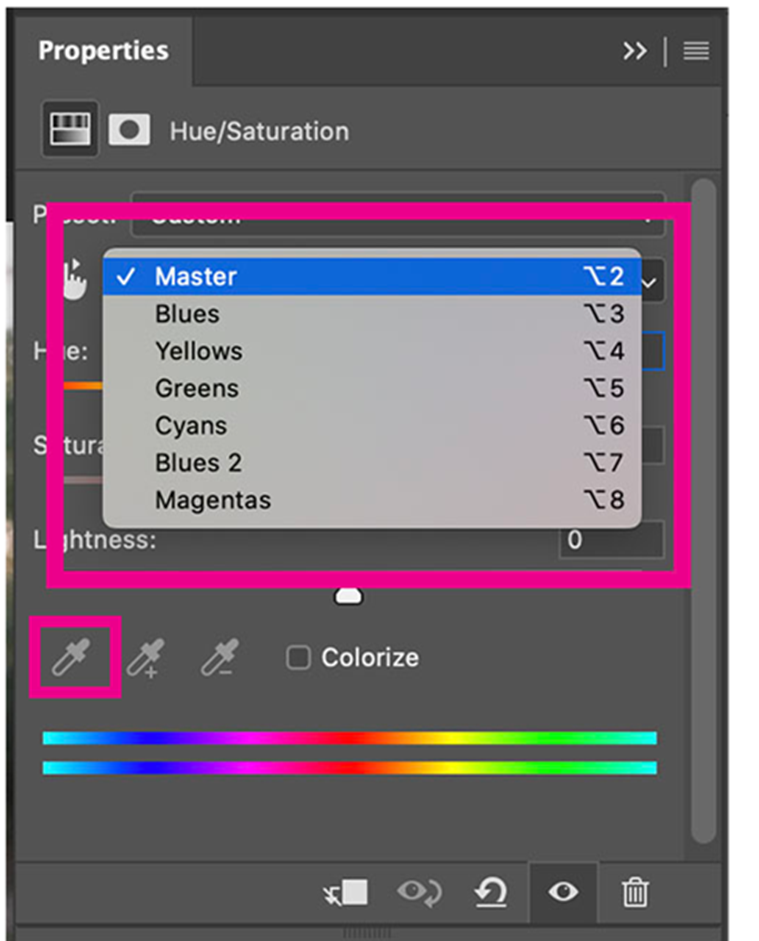
Hue & Saturation Adjustments with Individual Colour Channels
In the control panel, you will see a drop-down menu that says “Master”. This is how you control which colours you are affected with the sliders. When Master is selected, every colour in the image will be changed.
If you want to make changes to only one colour, click the drop-down and select the colour.
If you only want to make changes to a specific area or shade of the colour, use the eyedropper tool to select that specific shade.
5. Black & White
One of the best ways to make an entire IMAGE black and white is to create new adjustment layers that convert the image to black and white.

6. Gradient
Gradient tools are used to create a gradual blend between multiple images. You can either create your gradient fill or choose from the already existing gradient.
There are some gradient options too which you can choose from:
A. Linear Gradient
B. Radial Gradient
C. Angle Gradient
D. Reflected Gradient
E. Diamand Gradient
These are a few of the adjustment layers that you can use in your images to harness their full potential.
Visit to Get Our Expert Martech Consultancy
Conclusion
Adjustment layers are a necessary tool for anyone working in digital art or photo editing. It provides a flexible and efficient way to make changes to your image, allowing you to experiment freely.
Whether you are a beginner or an experienced artist, mastering the adjustment layer will open up new possibilities for creative projects.


